https://techsviewer.com/install-macos-mojave-vmware-windows/
At the recent World Wide Developers Conference (WWDC 18) that as held on 4th June 2018, Apple released a new operating system that is now bigger and better. The macOS 10.14 Mojave will be packed with many cool features. Top among these are better security and performance and a new dark mode. The latter is particularly a cool feature that everyone is talking about, and we all want to try it out.
What is macOS Virtual Machine?
A Virtual Machine is one which does not exist physically but is made to exist using the VMWare Workstation software. In this case, you will have a macOS virtual machine that operates on macOS 10.14 Mojave. You have a Windows PC but you can open the virtual machine and have a Mac on the same computer. The VMware Workstation Player is like any other application or program on your Windows computer but when opened it takes you to the world of the Mojave; the macOS Virtual Machine.
In order to create this virtual machine, there are various things you will need. One is the Mac OS X VMware image which is the same one Mac users would use to install the operating system. You will also need to download the VMware Player which is a free program and the Patch Tool. More on these below:
Download macOS Mojave VMware Image
This is the image containing all the information required to install the OS X operating system. The one provided here is created on the Mojave installer file. It is fresh and clean and will make it easy to do the installation. To use it, ensure that you have Winrar or 7zip software. If not, be sure to download Winrar before getting started because this will be needed to unpack the macOS Mojave VMware image.
macOS Mojave Final: 10.14.0; 18A391 (September 24, 2018)
Mojave Image (One Full): Download Link
Mojave Image (6 of 6): Download Link
Mojave Image (Backup): Media Fire Link
macOS Mojave 10.14.3; 18D109 (February 7, 2019)
Google Drive (One Full): Download Link
Google Drive (6 of 6): Download Link
Media-fire (One Full): Download Link
Torrent (One Full): Download Link
Fix Download Limit: https://techsviewer.com/fix-download-limit
Patch Tool & VM Tool: New Link
Winrar: https://goo.gl/PQHT
VMware Player: Free download
Steps to follow to Install macOS Mojave 10.14 on VMware on Windows
Step 1: Extract the macOS Mojave Virtual Image
For this step, you will need Winrar or 7Zip software and the macOS Mojave 10.14 virtual image file (.vmdk). You can find links to both above. Download Winrar of 7Zip and install it on your PC. Also, download the macOS VMware image virtual file and note where it is stored.

Extract Virtual Image File (RAR file)
Go to the folder containing the virtual image file, and right-click on Rar file (or Part1.rar). Select “Extract Here.”
Step 2: Install the VMWare Player
You can find VMware Player as free virtualization software that can be found at the link provided. Open the link, download VMware and install it in your PC.

Install VMware Player
Step 3: Install Patch Tool
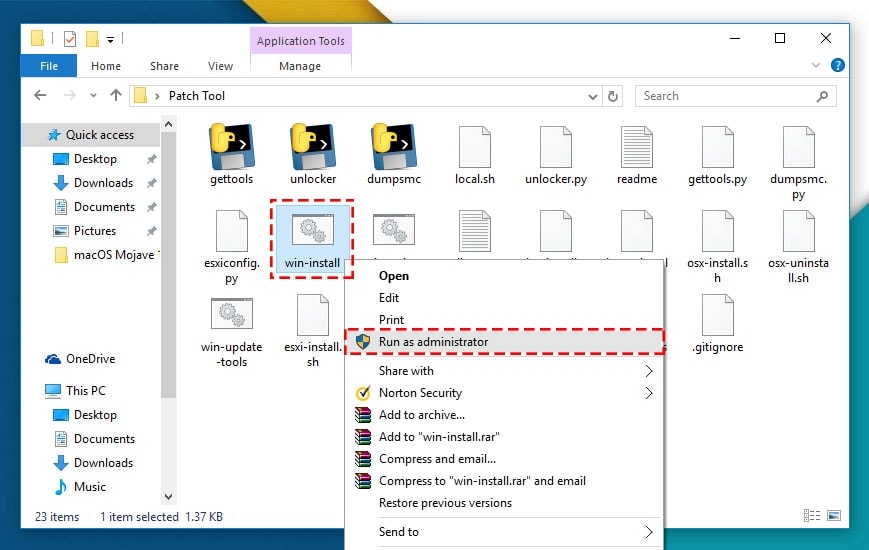
To do this, open the Patch Tool folder. From the files list, right click on “win-install.cmd”. Choose “Run as Administrator”.
Step 4: Create a Virtual machine on VMware
Open the installed VMware player and click on “create a new virtual machine”.
create a new virtual machine
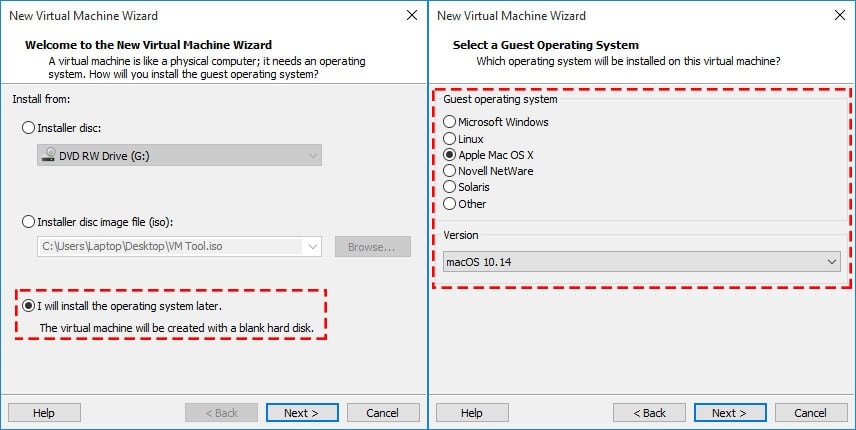
The new virtual machine wizard will be opened. Choose to install the operating system later from the options and click on “Next”. In the next page, choose the Guest operating system which in this case is the macOS 10.14. Click on the “Next” button.
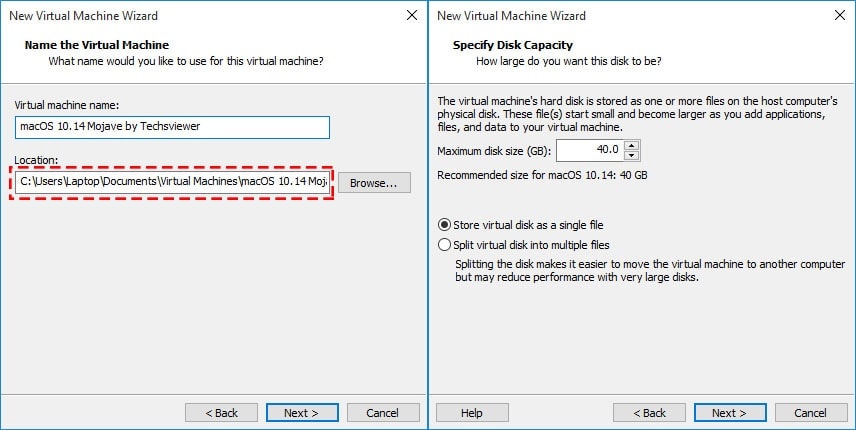
VMX Folder Location
In the next screen, name the virtual machine and choose where it is to be stored by browsing the location. This is known as the VMX folder. Click on the “Next” button. On this screen, specify the storage space to be allocated to the virtual machine. By default, this is set to 40GB and there is no need to edit it as it will be removed in subsequent steps. Just choose “Store virtual disk as a single file” and click “Next”. Confirm everything and click on “Finish”.
Step 5: Edit the Virtual Machine
Open VMware and select “macOS Mojave 10.14”. Click on "Edit the virtual machine"
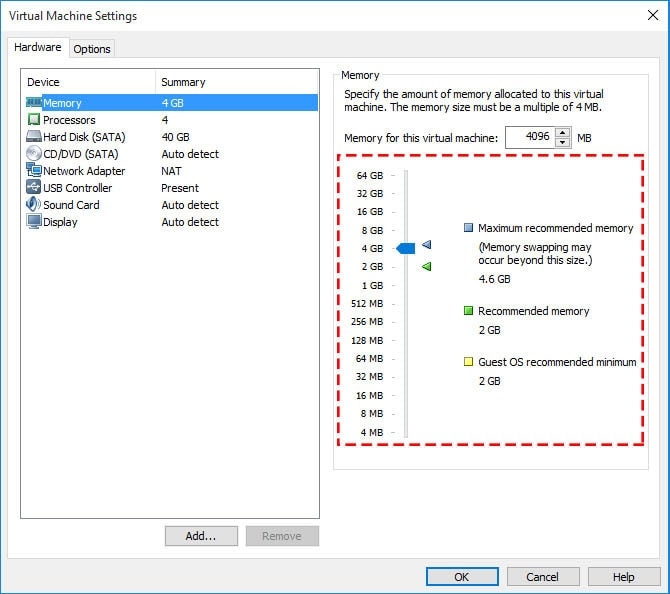
Select the Memory tab and set 50% – 65% of your RAM
Set the CPU to 50% - 70%. Click “OK” to effect the changes.
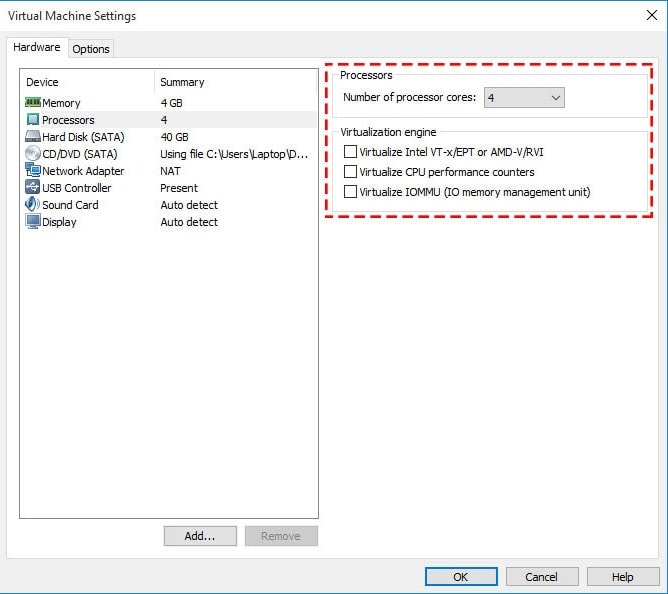
CPU
In the list of devices, choose the "Hard Disk" on device menu option. Click on “Remove” button. This removes the virtual hard disk created when first creating the virtual machine.
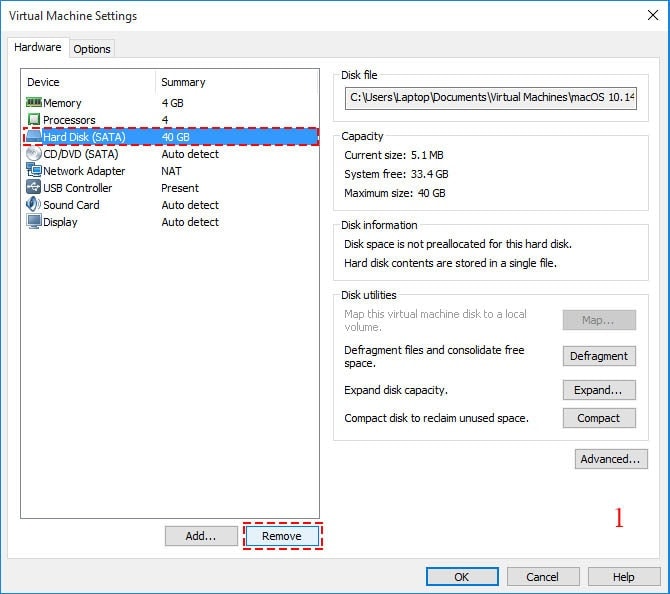
Remove Hard Disk
Then click "Add".
To make a new virtual disk on VMware, click on Hard Disk on the list of devices then choose “SATA” followed by “Use an Existing disk”.
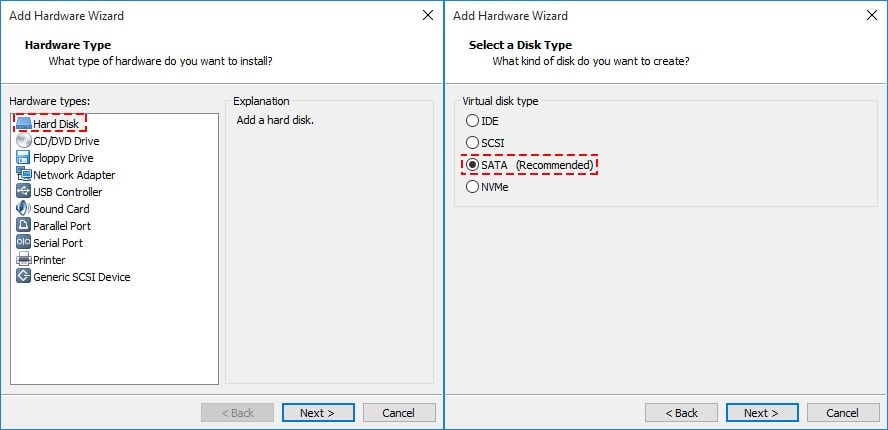
To select the disk, use the browse button to open the location where the “macOS Mojave 10.14.vmdk” file is stored. Select it and click on “Finish”.

Open macOS Mojave Virtual Image
Step 6: Editing the VMX File
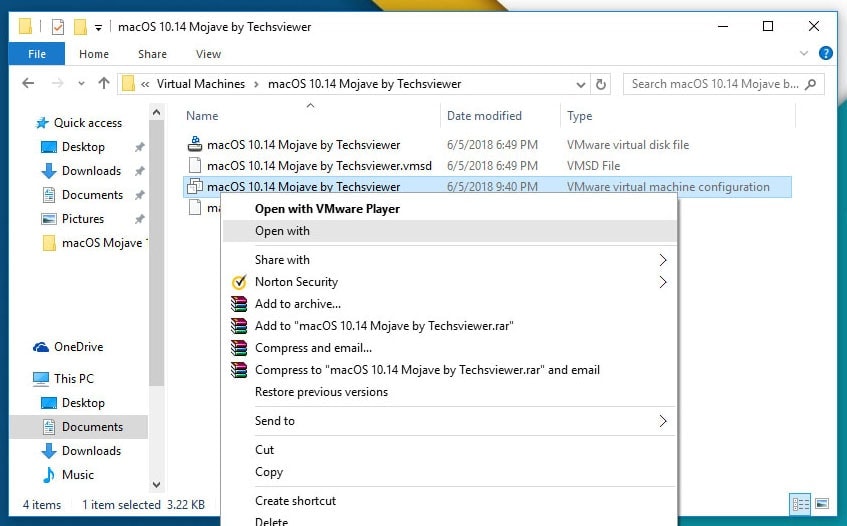
The VMX file is the configuration of the VMware Virtual Machine. To edit it, open the macOS 10.14 folder where you stored it (VMX folder in step 4). If you did not specify its location, look in Documents\virtual machines\.
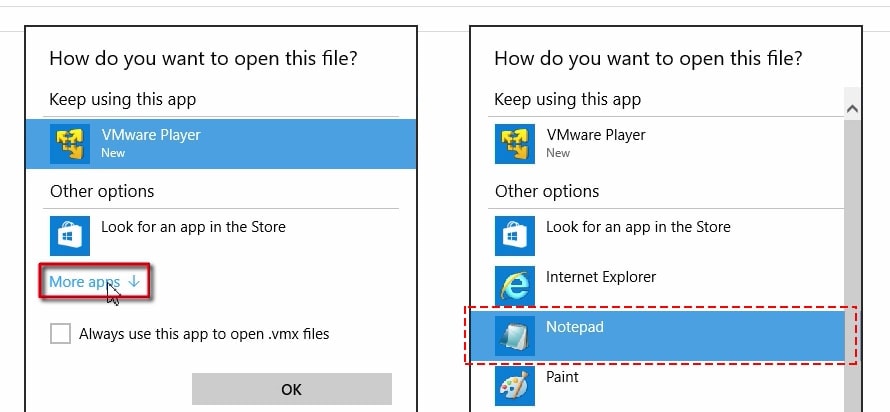
Right click on the VMX file and choose “Open with”. Choose “More Apps”. From the list of apps that will be seen, choose “Notepad” and press Enter.
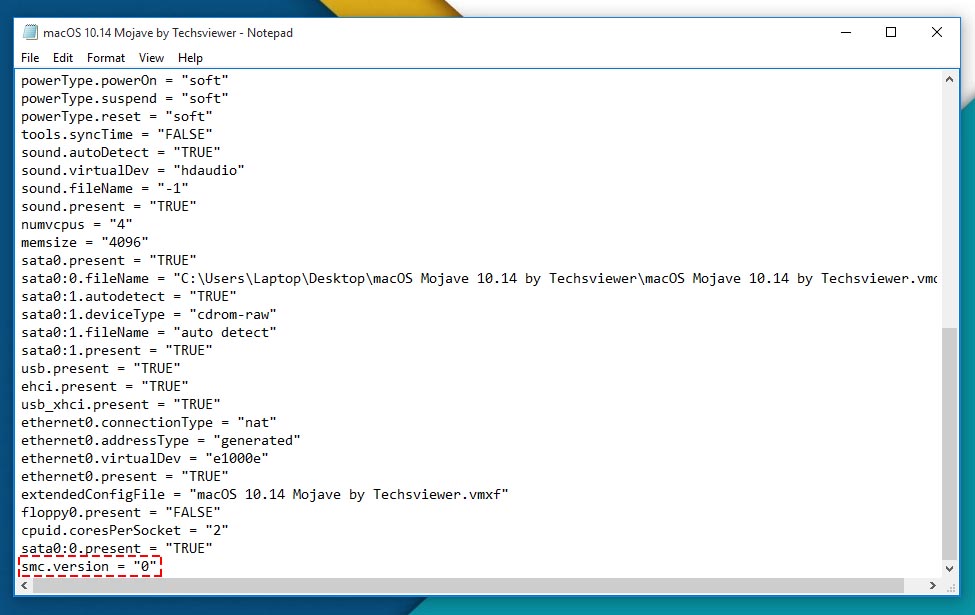
This will open the VMX file in Notepad. At the bottom; add the code:
smc.version = "0". Save the changes by clicking on “Ctrl+S”.
Step 7: Play macOS Mojave
Open the VMware player if you had closed it and click on “play virtual machine”, and create a new account.
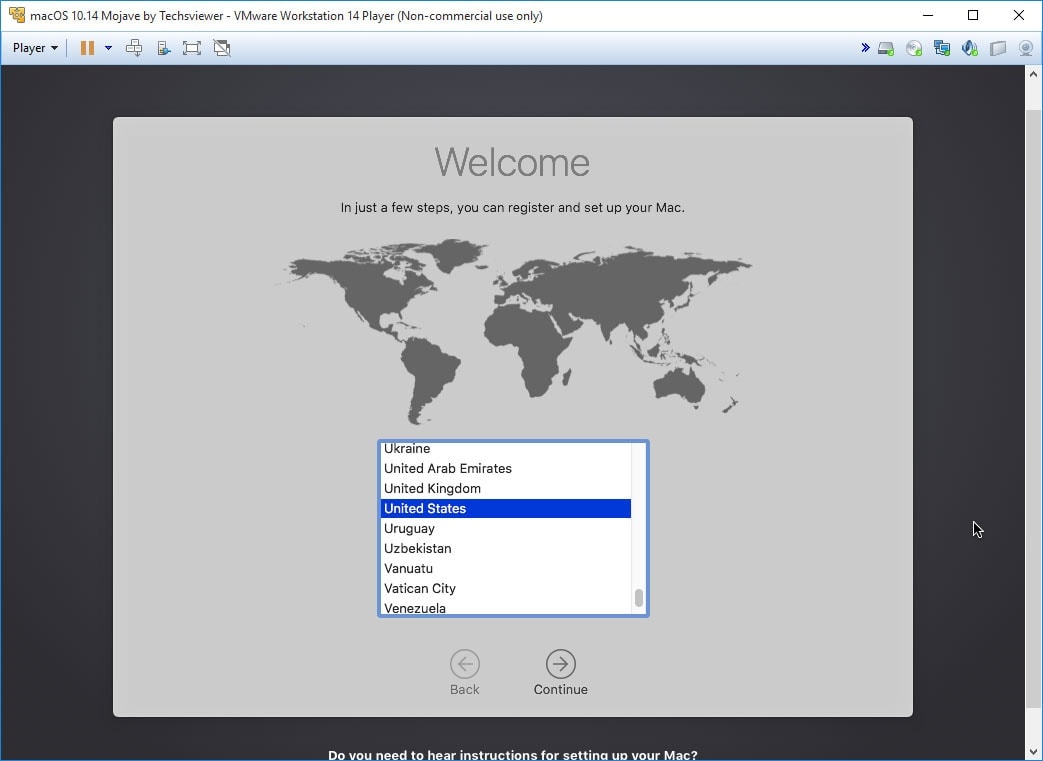
Create a New Account

Light or Dark mode
After this, the macOS Mojave will be set up.
Step 8: Install VMware Tool
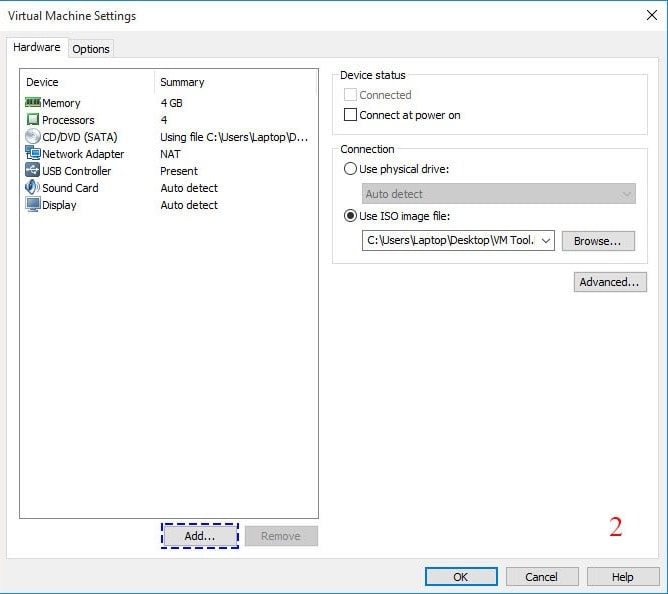
To install the VMware tool, click "Player", then click on “Removable devices” then “CD/DVD” then “Setting” then open the “VM Tool.iso” file. Check the “connected” button and click “OK”.

Install VM Tool
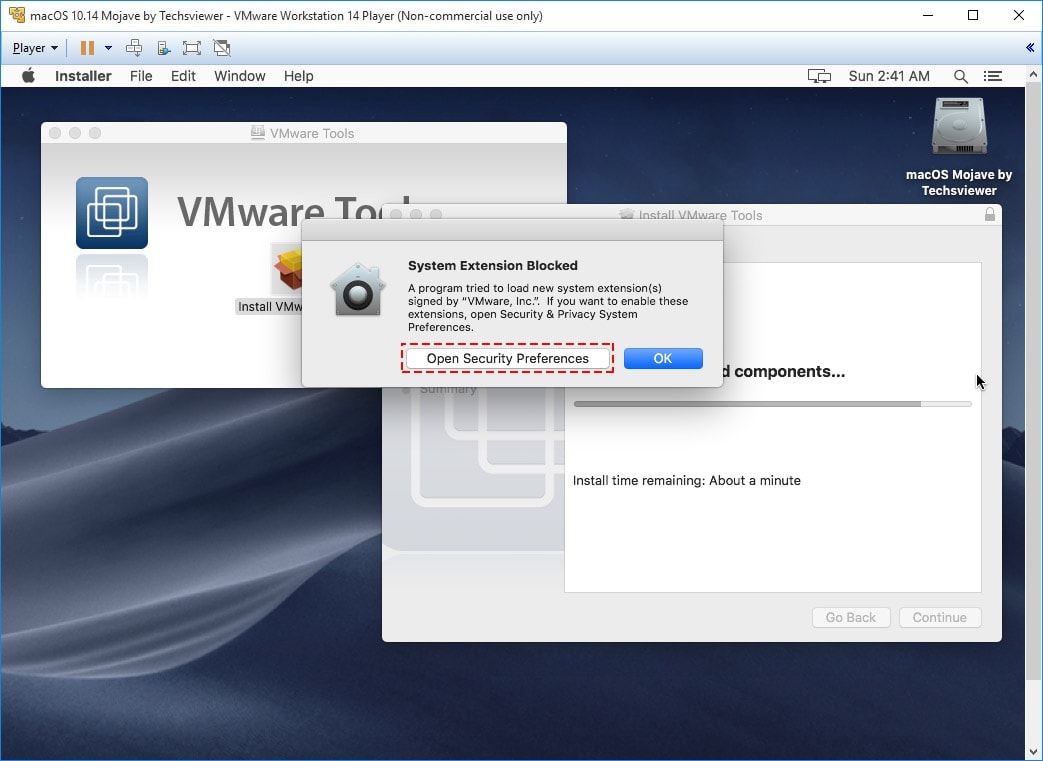
Click "Install VMware Tool", this will take a while. You need to enable VMware system extensions. To do this, click on “Open Security Preferences”.
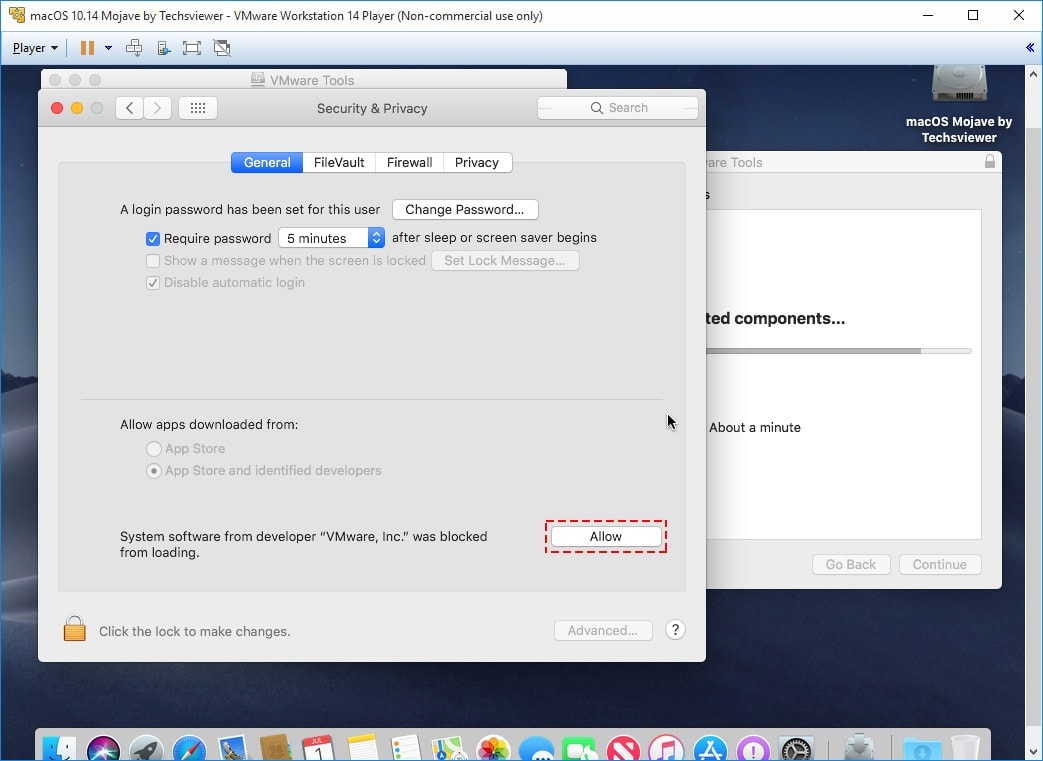
Click on the “Allow” button.
Click on the “Restart” button to restart the virtual machine.
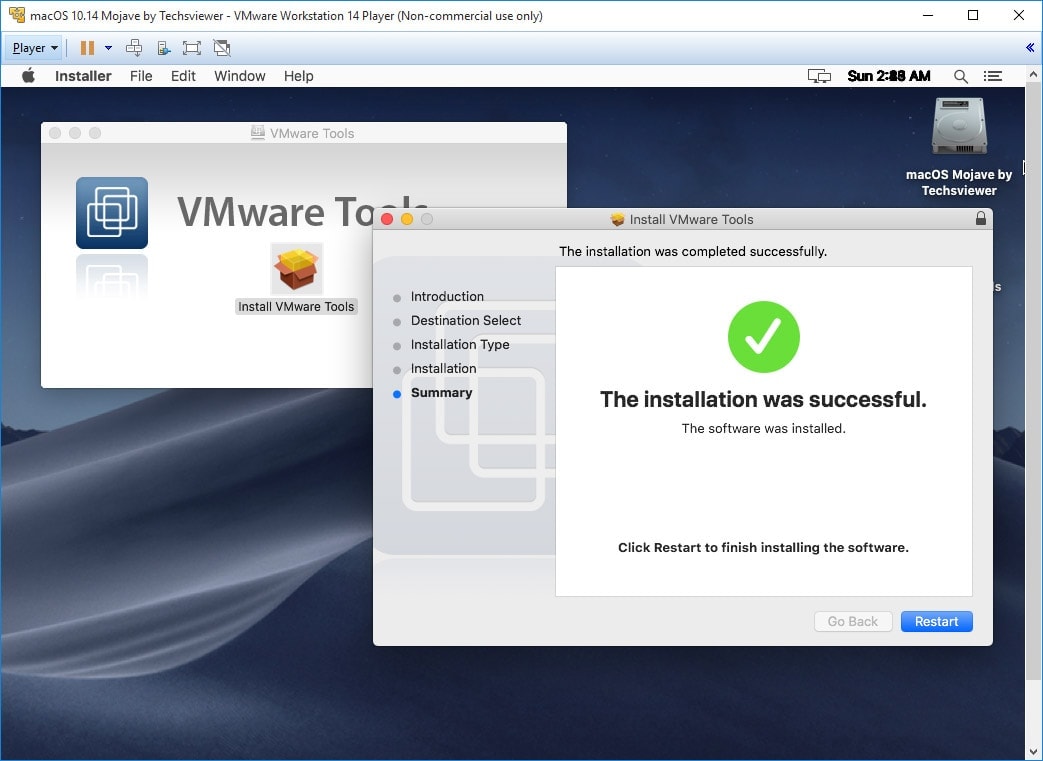
Done! macOS 10.14 Mojave Final on VMware on Windows PC

Bottom line
With VMware, it is possible to run Mac on Windows PC. This the best free virtualization software out there. With it, You can run a Mac on the same PC hosting the Windows operating system. This is the solution for people who cannot choose any among the two best operating systems! You can now have both Windows and macOS on one computer. You never have to choose one.
Featured Posts:
How to Enter Full Screen Mode on New macOS on VMware
How to Boot a macOS Mojave Virtual Machine to Recovery Mode


