스마트폰앱
- 전화 다이얼러
- 모바일 VOIP
- 안드로이드 프로그램
- 아이폰 앱 프로그램
- 네트워크 프로그램
- JAVA 자바
- UI DESIGN
- android JNI
- http post get
- 휴대폰 해외로밍


 친추
친추 카톡
카톡
라인상담
라인으로 공유
페북공유
◎위챗 : speedseoul

http://blog.neteril.org/blog/2013/10/10/framelayout-your-best-ui-friend/
You have probably already used FrameLayout (doc) for what it’s named, adding a decoration around other content element. It can actually be much more than that and is probably one of the most versatile container of all.
The secret of FrameLayout is how it layouts its children. Although normally designed to contain one item, it will happily stack up other element on top of each other. Thus FrameLayout is essentially a way to manipulate the Z-order of views on the screen.
This is super useful for a couple of UI tricks from HUD-like elements to sliding panels to more complex animated transitions. In this post we will see an example for each of those.
Overlay Elements
As I mentioned, FrameLayout will automatically stacks its children on top of each other. This makes it really easy to implement overlay or HUD element in your interface.
The idea is to wrap the part of the UI into an outer FrameLayout instance. Generally this will be the root element of your layout. You can then add below the main layout definition the other elements you want to overlay.
These elements will generally have a fixed size or be set as wrap_content. You can then place them at the right position on screen using the layout_gravity and layout_margin XML attributes.
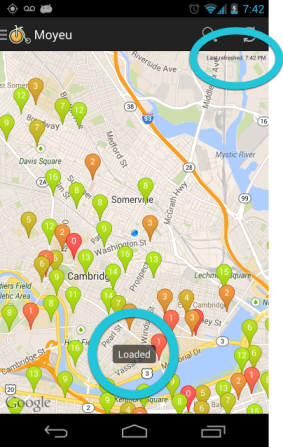
In the following screenshot, my main content is a Google Map view. I have then added two overlays above it, one that replicate a toast message (center-bottom corner) and a TextView displaying the last time the data was loaded (upper-right corner).
This is simply achieved with the following layout:
Being just normal views, you can manipulate the overlays as usual. For instance you will probably want to implement some sort of animations for transition between visibility states if the overlay is transient.
Sliding Panels
Sliding panels (aka drawers, aka fly-out menus) are the rage these days. They mainly consist of a panel that is placed, depending on the desired spatial effect, above or below another piece of content. Again this falls back to placing elements using a FrameLayout object.
The trick then is to use the translationX and translationY properties of the panel View to move the element back and forth.
Alternatively, View also exposes the OffsetTopAndBottom and OffsetLeftAndRight methods (working on display list directly) but those are not as easy to animate. Indeed, with the translation properties you can directly use ObjectAnimator or ViewPropertyAnimator.
The panel is initially “hidden” by setting its translationY property to its height (i.e. top side forced to the bottom of the screen). We create the initial appearing effect with the following code piece inside the panel class:
A common idiom of those panel is also to draw a shadow on the edge where they meet the content. This can be implemented very efficiently by overriding the DispatchDraw method of the sliding panel Viewand drawing a black linear GradientDrawable at the right place (use the Translate method onCanvas for the right positioning).
Transitions
With the move to a Fragment world, everything becomes just another View to manage and thereby removing the need for Activity.
When you think about the different “screen” of you application as individual fragments it becomes very easy to manipulate them in fun ways. Notably, being just managed View objects, you can apply any of the animations techniques you are already familiar with to implement very nifty transition effects.
At the core of such system, you will find again the same idea of a central, expanded FrameLayoutsurface where your Fragment are added.
The idea is to pile the Fragment views on top of each other like a deck of card. The current screen is thus the first card of the pile and application transitions are then simply how you want the middle cards to be put on top.
I’m using this analogy of the card deck because the method we are going to use here isView.BringToFront. This method will move the view at the last position inside its parent array. The end result of that operation of course depends on the type of container but in the case of FrameLayout it will make the View be drawn on top.
Note that this method doesn’t force a relayout which is fine for FrameLayout since children individual bounds aren’t dependent on each other but in the case of e.g. LinearLayout you will have to callRequestLayout for the modification to happen.
We will assume the layout of our main Activity is a single full-size FrameLayout container. Our application is composed of two screens represented as two fragments.
Initially, we create and attach directly those fragments to our content frame, hiding the second one to get into an initial state:
When we want to change the Fragment that is shown, we will make sure that both views are on top of the drawing pile with the current one being on top of the other using BringToFront. We then swap the two fragments in a FragmentTransaction:
To add a bit of woosh, we are using customs animations to mark the transition between the two fragments to get this result:
![]()
These animations need to be defined in an XML resource using either property animator (aka from Android.Animations) if you are using framework Fragment or using view animations (aka from Android.View.Animations) if you are using Fragment from the support package.
To register custom animations, we call the SetCustomAnimations method on FragmentTransactionlike so:
The first animation will be run on any fragment added/attached/shown while the second animation will be played on fragments hidden/detached/removed. Both are ran at the same time but you can use the animation startOffset attribute to delay one or the other.
For instance in my example, my frag_slide_out animation is defined like so:
Conclusion
Everything I have presented here is part of a big refresh to Moyeu. You can view the full source code on the GitHub repository at garuma/Moyeu.